Screenings are one of the most important jobs school nurses do. We are often the first to determine that a student may need glasses or hearing assistance to improve their education.
The who and the when of screenings will depend on the state and district in which you are working. To find out who needs what screenings and when you can Google “mandated school screenings x state name” It will usually take you to your state department of health where you can see the information regarding mandated screenings. Here is an example of my state department of health website regarding screenings: https://www.health.pa.gov/topics/school/Pages/Mandated-School-Health-Programs.aspx
For now I want to narrow it down to just vision screens (hearing screens will be in another post). For my state, I do vision screens on all students yearly. All students require a far & near visual acuity, 1st graders also get the convex lens test (more about that later), and 1st & 2nd also get color vision and stereo tests. Students that are newly enrolled in the district should have all the tests also.
Equipment
- Eye charts: there are multiple kinds of vision screening charts we can use for students of varying ages and abilities. More on those below.
- Light box: A holder for the screening charts that has a backlight. Not everyone has access to a light box but they are useful to get the best screening.
- Eye occluder: I generally have the student use their own hand to occlude one eye but you can also use the handheld eye occluder paddles if desired. Just be sure to clean them between each student.
- Stereo glasses and cards: The stereo vision test is a test of the ability to see 3D images and test for amblyopia, strabismus and poor ocular alignment. This test requires the stereo vision (3D) glasses and the stereo vision (3D image) cards.
- Color chart book: to test for color blindness we have a book of shapes made with varying color dots.
- Convex lens kit: Convex lens kit usually consists of a pair of +2.25 glasses to pair with the regular far vision charts.
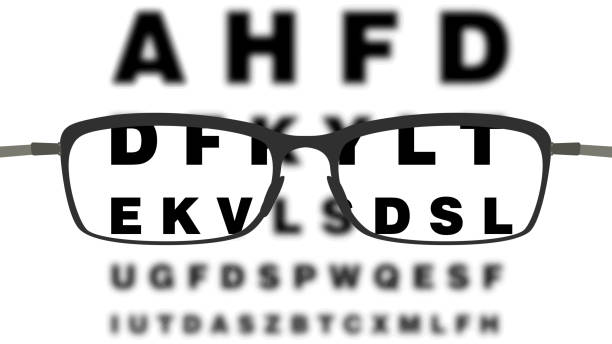
Eye Charts
- Snellen: This is the regular letter chart usually used for students who are able to read and recognize letters. The Snellen chart originally consisted of hooked letters as opposed to the Sloane chart that has block letters. The current day Snellen chart now is called a Snellen/Sloane chart as they have changed the letters to all block letters. Snellen is the one with single rows of letters and the red and green lines.
- Sloane: The letter chart similar to Snellen but made with block letters instead of hooked letters. It is just a more modern version of the Snellen chart and sometimes called the Snellen/Sloane chart.
- Near vision cards: Near vision cards are (as you probably guessed) to perform the near vision test. They are smaller, handheld cards with either letters, shapes or sentences on them. They are meant to be held approx 13-16 inches away to read.
- LEA symbols: A chart for younger students who may not be fluent with their letter recognition. This chart has a series of shapes instead of letters. Sometimes it comes with corresponding cards or a single page with the shapes for the student to point to.
- HOTV: a simpler letter chart consisting of just the letters H, O, T, and V. This is sometimes used for the younger kids or people who are not fluent in reading.
- Tumbling E: Another chart for those who are not fully literate, an alternative to the LEA chart or the HOTV chart featuring “E” in different positions along the lines. The tumbling E chart has a capital letter E in varying positions and sometimes comes with a card or a plastic E so the student can demonstrate the position of the E.
- Hands: Similar to the tumbling E chart, the hands chart has a series of hands in different positions. The student can demonstrate with their own hand what position the hand they are looking at on the chart is.
Vision Tests
- Far acuity: The most common vision test used to assess for nearsightedness (difficulty seeing things at a distance).
- Near acuity: Used to assess for farsightedness (difficulty seeing things that are close up).
- Convex lens: A further assessment of nearsightedness, convex lens assesses for severe nearsightedness.
- Stereo: To assess for amblyopia, strabismus and poor ocular alignment. This test uses 3D images and 3D glasses to test how the two eyes work together.
- Color: tests for color blindness by looking at a series of shapes created from dots of varying colors.
Automated Vision screener: the automated vision screener devices are machines that will perform the vision screenings for you. These are sometimes known by brand names such as the Spot Screener, the Optec Screener, the Pulseoptix, or a few other brand names. They all have varying abilities to test different types of vision. They can be very expensive but if you can afford one for your district they are really helpful. The only caveat is that not all districts legally allow them and require physical vision screens to be performed. Check with your district heads and state health department for your specific state.
Procedures
Check with your state department of education and your district to check for any specific guidelines for screening student’s vision. This information is based on my state’s guidelines and instructions for screening.
Every vision exam should start with a visual inspection of the student’s eyes. Do they exhibit any nystagmus (shaking/movement of the eye), esotropia/exotropia (misalignment of one or both eyes inward or outward), drifting of one or both eyes, squinting, or any abnormal appearance of the eyes. Do they have any history of eye or vision problems?
Are there any language concerns? If so is there a translator available to assist? My teachers are kind enough to send the students with less english down with a student who can translate for them but I also have some in person translators available in my building.
Assess if the student already has glasses or contacts. If they do then they should perform the test with them on. Far vision should be performed with glasses for distance, near vision should be performed if their glasses are for near vision. If they forgot them then they should return at a later time with the glasses. If they are prescribed them but they don’t have any then consult the parent about getting a new pair of glasses. Offer assistance if there is a need.
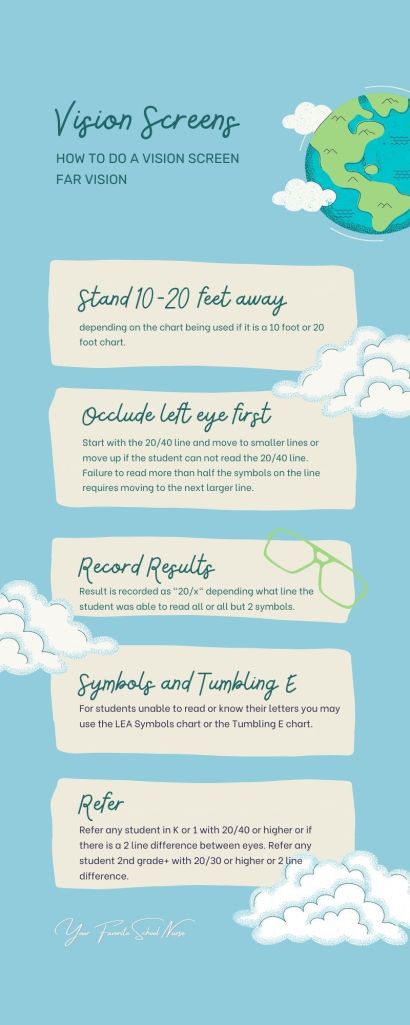
Far Vision:
- Determine the appropriate chart for the student based on age, grade, and ability.
- Have the student stand either 10 feet or 20 feet away depending on which chart you are using (I have a premeasured spot marked on the floor for 10 feet away).
- Have the student cover the left eye first – if you routinely start with the same eye for every student it makes it easier to record the results correctly.
- Begin with the 20/40 line. If they pass 20/40 move down to the 20/30, 20/20 and so on. If they can not see the 20/40 line then move up to the larger lines instead.
- Failure to read more than half the letters/symbols on a line requires moving to the line above until they can read everything on the line.
- Repeat with the right eye.
- If you are using the hands or tumbling E chart, instead of asking them to state the letters you will have them use the hand they aren’t covering their eye with the demonstrate the position of the hand or the E you are pointing to.
- Refer: Any kindergarten or grade 1 student who’s acuity is greater than 20/40 or has greater than a 2 line difference between eyes should be retested and if same results should be referred. Any grade 2 and above student who’s acuity is greater than 20/30 or has a 2 line or greater difference between eyes should be retested and/or referred.
Convex lens
- While the student is still standing 10/20 feet away for the far acuity test, have them wear the convex glasses, occlude left eye.
- Starting with the 20/20 line ask them to read the letters/symbols. move up as far as the 20/40 line.
- If the student can NOT see the lines with the convex lens glasses on that means they PASS the test.
Near vision
- Have the student occlude the left eye first.
- Hold the near vision testing card approximately 13-16 inches away from the student and ask them to read the smallest line they can see without squinting or leaning in to the card.
- Repeat for the right eye.
- Refer: Any kindergarten or grade 1 student who’s acuity is greater than 20/40 or has greater than a 2 line difference between eyes should be retested and if same results should be referred. Any grade 2 and above student who’s acuity is greater than 20/30 or has a 2 line or greater difference between eyes should be retested and/or referred.
Stereo
- Have the student wear the polarized stereo vision testing glasses.
- Show the student the raised “E” figure on the demonstration card at 16 in (40 cm).
- Tell the student that the raised figure is popping off the card. Show the student the raised “E” paired with the blank card. Ask the student to point to the raised “E”.
- Repeat this process until you are certain that the student understands and can correctly identify the raised “E”. Once the student understands, start the screening test.
- Present the cards six times at 16 in (40 cm) and ask the student to point to the “E” on each presentation (shuffle the cards behind your back between each presentation).
- Refer: Refer if the student cannot identify the “E” correctly in four of six attempts.
Color vision
- Holding the pseudoisochromatic test cards approximately 30 in (75 cm) away, instruct the student to identify the number, symbol or trail seen on each of the designated cards, allowing for 3 seconds per card.
- Refer: If the student does not correctly identify the manufacturer’s suggested number of cards, he/she has failed the test.
Resources
- Local Lions club: one of the service projects the Lions Club does is to work with vision screening and obtaining glasses for kids and adults. Some school nurses have been able to schedule vision screening events with their local Lion’s Club.
- Vision to Learn: Helps students in low income communities obtain eye exams and glasses.
- Local association for the blind: I’ve linked the Pennsylvania Association for the Blind here but Most states also have a chapter.
- Local ophthalmology colleges: I’ve linked here a local ophthalmology school that my district uses as an example. You most likely have something similar in your area as well. The local one to me can schedule vision exam events at my school with the ophthalmology students.
For special needs students it can sometimes be difficult to complete the vision screenings depending on their level of disability but don’t neglect them! You can try various things such as the hands and E charts, meet them where they are – literally – if you have to sit on the floor and coax them into trying the exam then do that. If you’ve tried and they are unable then they can be referred to their doctor for evaluation if there are any concerns.
If anyone is an expert in vision screens in school or has any great resources or info to add please follow and message me or comment here and let me know what you think!
References
https://www.health.pa.gov/topics/school/Pages/Vision-Screen.aspx

