Vaping: They Thought It Was Supposed To Be Safer.

Remember when vaping and e-cigarettes came on the scene and everyone was thrilled that they could now “smoke” with virtually NO ill effects? So healthy! People indoors, “smoking” fruity flavored, cotton candy, apple pie flavored oils because it’s a healthy alternative to getting your nicotine in AND you can do it indoors right in people’s faces!

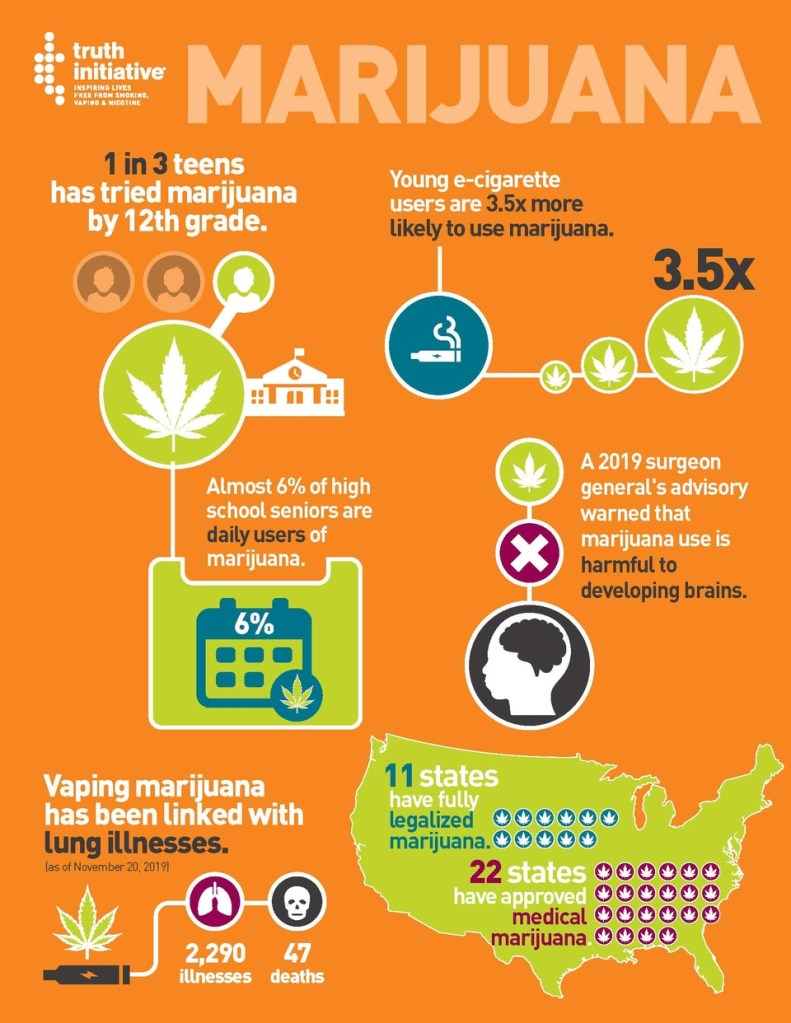
Later came new laws regarding marijuana legality in various states, dispensaries, and people vaping marijuana. It seemed like a great idea at the time for sure as there can be many benefits to using THC for various ailments from cancer pain, nausea from chemo, relaxing Parkinson’s tremors, relaxing tourette’s tics, managing severe autism, stimulating eating in a person with dementia, other pain like migraines and arthritis, to anxiety and PTSD.

So let’s get into it: the good and the bad of vaping. Yes, there is some “good” but in reality, after all the research that is being done, all the physical injuries related to vaping nicotine or THC the bad outweighs the good and it’s just not worth it.

Pros:

People started vaping oils and e-cigarettes as a way to cut down on the many many chemicals found in cigarettes. Smoking cigarettes expose you to literally thousands of dangerous cancer causing chemicals, puts you at risk for many forms of cancer aside from just lung cancer, and puts you at risk for heart disease, lung disease like COPD, stroke, and diabetes just to name a few.

  • Vaping exposes you to fewer chemicals than smoking cigarettes. This is also a con because vaping still exposes you to other different dangerous chemicals.
  • Vaping does not expose you to tar or carbon monoxide like cigarettes do.
  • If you’re vaping THC you get a better product delivery than smoking dry flower because it is more concentrated THC. This is also a con because a person who is new to using THC is more likely to have greater effects from vaping and is more likely to have greater side effects.
  • That’s all the pros I’m gonna give because the reality is that there are no pros to vaping or smoking.

Cons:

  • Vaping exposes you to different dangerous chemicals than smoking including Diacetyl, Formaldehyde, and Acrolein. These chemicals when ingested in the vaping oil can lead to severe lung damage and even death. In addition, the vape pens themselves often offer exposure to other dangerous chemicals and metallic compounds from the heating coils that can cause irreversible lung damage such as something called Bronchiolitis Obliterans aka Popcorn Lung.
  • Many vape products contain propylene glycol and glycerin, which, alongside many other polycyclic hydrocarbons, are linked to the development of cancers and lung and cardiovascular diseases.
  • Vaping with cartridges that are not from either a regulated dispensary or made in one’s own home have the potential to have other additives like vitamin E oil which can lead to permanent lung damage. Vitamin E is often used as a thickening and delivery agent in e-liquid. And, while it’s safe when taken orally as a supplement or used on the skin, it’s likely an irritant when inhaled. It’s been found in the lungs of people with severe, vaping-related damage.
  • Teens’ brains are not fully developed yet. Teens who are exposed to chemicals such as THC, Nicotine, Alcohol or other illicit substances are highly susceptible to cognitive deficits like memory problems, poor coordination, poor reflexes, poor decision making skills.
  • Because of the lack of full brain development, teens are more likely to develop marijuana use disorder or addiction to marijuana. They are also more likely to develop poorer academic success, poorer career success, lower life satisfaction and increased relationship problems.
  • Marijuana use as a teen can lead to increased depression, anxiety and increased risk for developing schizophrenia.
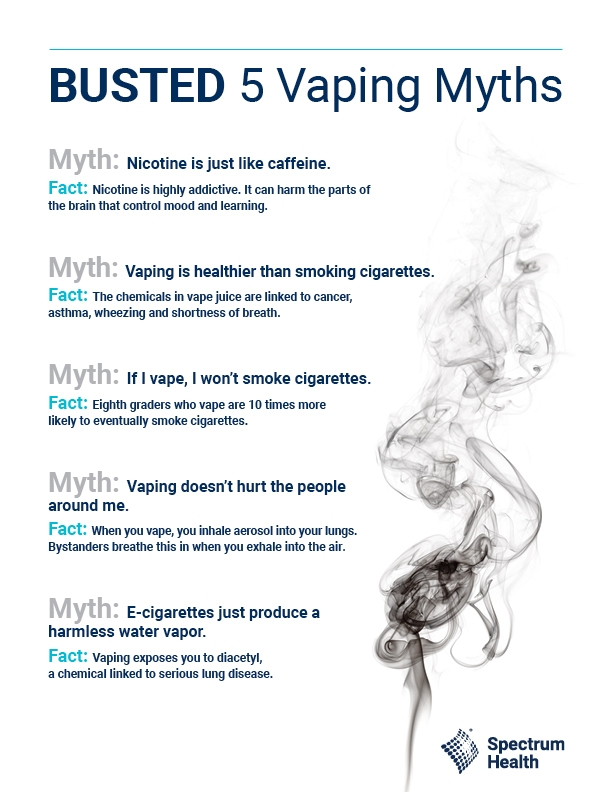
  • It is a myth that the second hand “smoke” from vapes does not affect those around you. The people that you are vaping in front of are now breathing in the same harmful chemicals that you are breathing in and putting them at risk. So all those people who think it’s ok to vape indoors in front of people are putting everyone else at risk as well as themselves.
  • Research has proven that switching to vaping does not in fact help anyone quit smoking.

What is in the vape juice/oil?

E-liquid, also called e-juice or vape juice, is what vaping devices use to make the vapor you breathe in. E-liquids aren’t just water. They usually contain:

  • Flavoring. Each flavoring has its own set of ingredients.
  • Nicotine, the addictive and harmful substance in cigarettes and other tobacco products.
  • Propylene glycol and glycerin, used to create vapor.

E-liquids and flavorings sometimes have other ingredients, including:

  • Chemicals that can cause cancer (carcinogens), like acetaldehyde and formaldehyde.
  • Chemicals known to cause lung disease, such as acrolein, diacetyl and diethylene glycol.
  • THC (tetrahydrocannabinol), the chemical in marijuana that gets you “high.”
  • Vitamin E acetate, linked to lung injury caused by vaping (EVALI, see below).
  • Heavy metals like nickel, tin, lead and cadmium.
  • Tiny (ultrafine) particles that can get deep into your lungs.

Health problems associated with vaping

  • Popcorn lung: Diacetyl, a chemical used in some flavorings, can cause bronchiolitis obliterans (“popcorn lung”). Bronchiolitis obliterans causes permanent scarring in your lungs. Popcorn lung gets it’s name from it’s discovery in people who worked in a popcorn factory who were breathing in Diacetyl and developed this permanent lung scarring.
  • EVALI (e-cigarette, or vaping, product use associated lung injury). EVALI is a serious lung condition that vaping causes. It causes widespread damage to your lungs and gives you symptoms like coughing, shortness of breath and chest pain. EVALI can be fatal.
  • Cancers: lung cancer, bowel cancer, many many forms of cancer can be caused by smoking or vaping.
  • COPD: Asthma, emphysema, chronic lung disease. This is permanent.
  • Heart attack/stroke: The increase in adrenaline and the decrease in oxygen flow can lead to heart attacks and strokes. You can literally die from this.
  • Addiction: Many people think that marijuana is not addictive but it most certainly can lead to marijuana use disorder. Also nicotine is highly addictive.
  • Injury from vape devices exploding or burning: Yep, that’s right, the devices can explode! They can also malfunction and burn you.

Alternatives:

  • Quit. If you are vaping nicotine then quit. I know that’s not as easy and it sounds but there is no physical need for nicotine in any form. For help to quit smoking you can look here: https://www.lung.org/quit-smoking/i-want-to-quit
  • If you are vaping THC or smoking flower for medical reasons, there are other methods of delivery for it than vaping or smoking such as edible, RSO, tinctures, creams and others. If you are using THC for recreation, it is legal for recreation where you live and you are of an appropriate age to use THC safely then again, there are other methods of delivery aside from vaping or smoking.

Additional facts about vaping

  • The smell from THC vapes is extremely short lived. Be aware that teens can more easily take a few hits from a THC oil vape and go undetected than if they smoked whole flower.
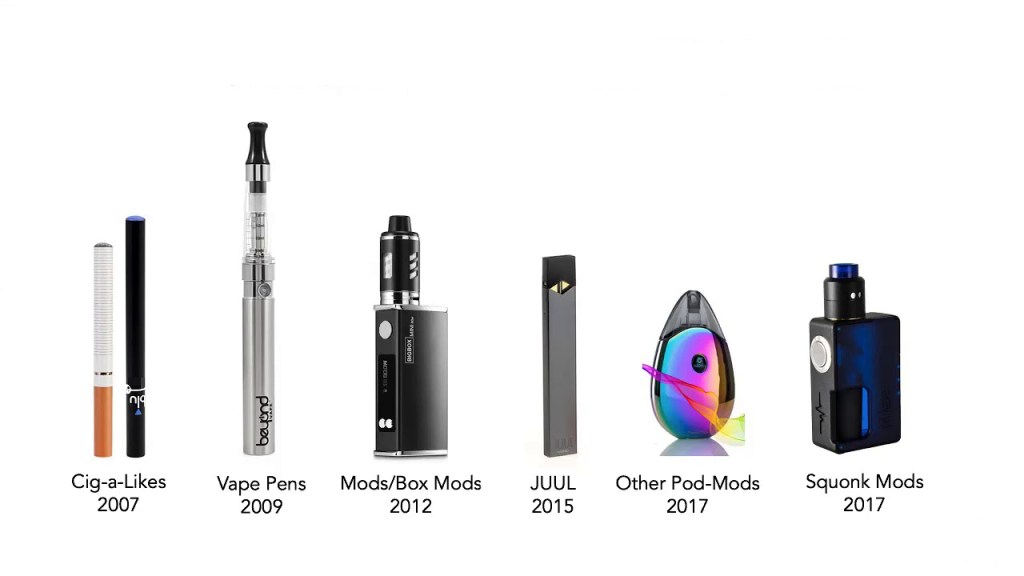
  • The devices for vaping have developed into things that look like other things. They might look like a USB drive, a cell phone case, an actual pen, or even a smart watch. Some of the paraphernalia might be disguised as other items also such as lip balm (dabs are stored in little jars that could be mistaken for other things).
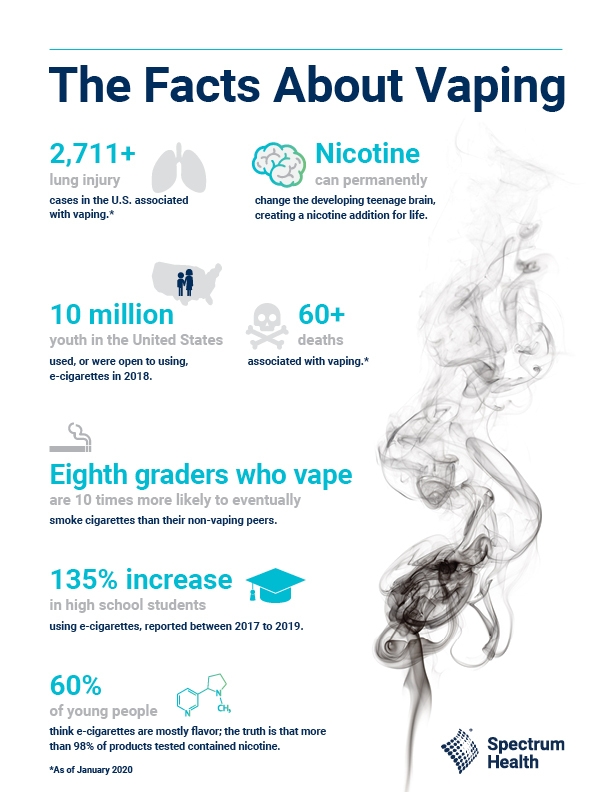
  • 60% of young people think that vapes are mostly just flavoring while the reality is that 98% of them have nicotine.
  • Researchers disagree on the statement that marijuana is a “gateway drug” as we were always taught in the 80’s and 90’s. There is little evidence suggesting that people who use marijuana continue on to using harder drugs although it is not impossible to imagine. That being said, marijuana use in teens is dangerous in itself anyway.
  • Even if you have a high quality THC product, the vape devices themselves can cause chemical exposure from the internal workings of the heat coils and chemicals used to heat them up.
  • It’s really expensive. Average cost to vape a JUUL – $1,008 PER YEAR; Average cost to vape refillable e-cigarettes – $1,512 PER YEAR. The average yearly cost of healthcare for e-cigarette users is $1.3 BILLION. Average cost of vape cartridges at a dispensary: $30-$50 and up!

Conclusion

It’s just not worth it. Vaping anything as a teen can seriously mess up your body and brain and affect the rest of your life. Vaping anything as an adult can seriously mess up your body and brain and also affect your life. For help and information about substance abuse visit https://www.samhsa.gov/.

Please like and follow my blog and comment with your thoughts on this topic!

References

https://www.cdc.gov/tobacco/basic_information/health_effects/index.htm#:~:text=For%20every%20person%20who%20dies,includes%20emphysema%20and%20chronic%20bronchitis.

https://www.lung.org/lung-health-diseases/lung-disease-lookup/popcorn-lung/learn-about-popcorn-lung#:~:text=Bronchiolitis%20obliterans%20is%20a%20rare,known%20as%20’popcorn%20lung’.

https://leafwell.com/blog/are-all-cannabis-oil-cartridges-safe-when-vaped/

https://www.nhs.uk/better-health/quit-smoking/vaping-to-quit-smoking/#:~:text=Vaping%20exposes%20users%20to%20fewer,like%20heart%20attack%20and%20stroke.

https://www.healthline.com/health-news/teens-and-disguised-vaping-devices

Assessment Basics for the School Nurse: Hearing Screens

Screenings are one of the most important jobs school nurses do. We are often the first to determine that a student may need glasses or hearing assistance to improve their education.

The who and the when of screenings will depend on the state and district in which you are working. To find out who needs what screenings and when you can Google “mandated school screenings x state name” It will usually take you to your state department of health where you can see the information regarding mandated screenings. Here is an example of my state department of health website regarding screenings: https://www.health.pa.gov/topics/school/Pages/Mandated-School-Health-Programs.aspx

For now I want to narrow it down to just hearing screens (vision screens are in another post). For my state (PA), I do hearing screens on kindergarten, 1st grade, 2nd grade, 3rd grade, 7th grade, 11th grade, anyone new to the district, and any students needing an IEP evaluation/renewal. If they had a hearing screen already at their yearly checkup then they can be exempt unless there is a concern.

Types of hearing tests

  • Pure-Tone Testing: You might remember putting earphones on and raising your hand whenever you heard the “beep.” This is pure-tone testing. It is sometimes referred to as “air conduction testing” since the sounds go through your outer and middle ear. This test helps find the quietest sound you can hear at different pitches, or frequencies. Having earphones on lets the sounds go to one ear at a time. This is sometimes done in a sound booth at the ENT or audiologists’ office. This is generally what you will find in a school setting as well.
  • Speech Testing: Speech testing is a test to assess how well a person can listen and repeat words. This is often done in a sound booth with headphones on by a speech therapist. It sometimes is done in a noisier place to assess if you can separate background noise from other sounds. The Pilot audiometer is a type of speech testing.
  • Tests of the Middle Ear: Tympanometry, acoustic reflex and static acoustic impedance measure the workings of the outer, middle and inner ear. These usually involve a probe in the ear canal to measure muscle response, eardrum movement and air levels in the ear canal. These will usually be done at the pediatrician or ENT/audiologist.
  • Auditory Brainstem Response (ABR): Measures the brainwaves associated with hearing and cochlear function. This can be done on younger children who are unable to actively participate in a hearing test (like newborns in the hospital), or to assess if the hearing loss is due to a brain pathway issue vs a structural ear issue. This is performed by audiology usually
  • Otoacoustic Emissions (OAEs): The OAE test is used to find out how well your inner ear, or cochlea, works. It measures otoacoustic emissions, or OAEs. These are sounds given off by the inner ear when responding to a sound. There are hair cells in the inner ear that respond to sound by vibrating. The vibration produces a very quiet sound that echoes back into the middle ear. This sound is the OAE that is measured. This is often used for the newborn hearing screens in the hospital and for pre-school students. OAE is not as useful for people over 5 years old but can be used if needed for someone who is unable to participate in a hearing screen.

Equipment

  • Audiometer: There are tons of brands and styles of audiometers. The MAICO is the most popular that you will see. They range in price from about $1000 up to $3000 depending on which model you choose. The Pilot is also made by MAICO but performs the speech test as opposed to the pure tone test – it is around $3400 on schoolhealth.com. Welch-Allyn is also a popular manufacturer of audiometers.
  • OAE machine: Usually for pre-k hearing testing, costs approximately $5000+ depending on the model and type of kit purchased.
  • Small toys or blocks and a bucket to drop them into (optional): Some audiologists and/or nurses like to use small toys to drop in a bucket instead of the raising hands for the hearing tests on the kinder or pre-k kids. I have a set of small colored blocks and a bucket to use if I think it will work better.
  • Otoscope: You may want to look in the student’s ears to assess for wax occlusion or abnormalities. This is optional as some states or districts do not allow school nurses to assess ears in this manner.
  • A very quiet space: It is extremely important to have the quietest space possible to perform hearing screens. Sometimes even the noise of the refrigerator humming or the air conditioner will interfere. This is why audiologists usually have a sound booth for optimal testing environment. If you have a little noise just be aware that the student may be unable to hear the quietest tones during the test.
  • A comfortable seat: You should have a chair and preferably a desk for the student to sit at during the test when they can feel comfortable and relaxed but also be able to turn away from you so the don’t see you pushing the buttons on the machine.
MAICO Audiometer
Welch Allyn OAE

Procedures

Basic procedure for pure tone hearing “sweep” test (aka “rapid” test):

  • Allow the audiometer to warm up for 15-20 min
  • Have the student sitting comfortably in a position where they can not see you working the machine and giving inadvertent clues to the sounds but the tester can also observe their face for responses.
  • Instruct the student prior to placing headphones that they should hear a “beep” and when they do they should raise their hand then put it back down. Alternatively, they can drop a toy into the bucket if they hear the beep.
  • Place the headphones on the student with the red earpiece on the right and the blue earpiece on the left.
  • Set the frequency to 1000 Hz and the decibels to 55 dB then deploy a tone.
  • Decrease the dB to 40, then 25 giving one tone for each.
  • Once at 25 dB test the frequency at 2000, 4000, 250, 500
  • Repeat process for the other ear.

Basic procedure for threshold test

  • Begin with frequency at 1000 Hz and decibels at 50 dB
  • Decrease decibels by 10 until the student no longer indicates they can hear the tones.
  • Increase decibels by 5 until they hear the tone again.
  • At 25-30 dB start increasing the frequency to 1000, 2000, 4000, then 250 and 500.
  • Note if the student does not indicate that they hear the tone.
  • Repeat procedure for the other ear.

Pass/Fail criteria

Per the Pennsylvania Department of Health (your state or district may have different criteria):

  • For the sweep test, a child not hearing two or more tones at 25 dB in one or both ears should be given a threshold test that day or within one month.
  • For the threshold test, a student whose threshold test shows a hearing level of 30 dB or more for two or more tones in one or both ears, or 35 dB or more for one tone in either ear, shall be referred to the family’s provider or usual source of care for a complete ear examination. A complete ear examination means otologic assessment and audiometric tests. It is the family’s responsibility to arrange this examination.

Tips & Tricks

  • According to the PA Dept. of Health instructions, you should allow the audiometer to warm up for 15-20 min.
  • Always make sure you have the quietest space possible for hearing screens. My personal office is not in a quiet location but I scouted the school for the best spot and an admin is kind enough to loan his office for my hearing screens. I also have set up shop in the kindergarten closets because they are large, insulated, and fairly quiet.
  • Before beginning the test make sure that the student fully understands the instructions. If there is a language barrier use your translating services or interpreter to ensure they understand what to do.
  • Red = right ear, blue = left ear
  • As mentioned, you can either have the student rise a hand when they hear the tones or make it fun and have them drop toys or blocks in a bucket when they hear the tone.
  • Be careful because the student might see you pushing the buttons on the machine and know when to raise their hand even if they didn’t hear the tone.
  • You can often observe the student’s face and mannerisms and tell when they hear a sound but are unsure. They may look questioning, or look around or stop to try and listen harder.
  • If you are permitted in your district, you can look in a student’s ears and determine if they have excessive or occluding wax that might be interfering with the hearing screen, or possibly fluid in the ear that could affect it. If they do then they would then need to be referred to their doctor for further evaluation as we are not able to remove the wax nor are we able to diagnose an ear infection or abnormality.
  • Clean the headphones between students with a lysol wipe.
  • Audiometers should be calibrated yearly. Ours usually go out for calibration at the end of the school year and we get them back in september/october. You would make arrangements with the dealer of the audiometers for calibration.

Are any of you hearing screening experts? I would love to hear some tips and tricks if you know of any! Please follow my blog and comment with any thoughts!

Our website is supported by our users. We sometimes earn commissions when you click through the affiliate links on our website

Resources

refehttps://www.health.pa.gov/topics/Documents/School%20Health/Pennsylvania%20School%20Health%20Procedures%20Hearing.pdfrences

https://www.asha.org/public/hearing/types-of-tests-used-to-evaluate-hearing/

https://www.asha.org/public/hearing/otoacoustic-emissions/

https://www.health.pa.gov/topics/school/Pages/Hearing-Screen.aspx

Assessment Basics for the School Nurse: Vision Screens

Screenings are one of the most important jobs school nurses do. We are often the first to determine that a student may need glasses or hearing assistance to improve their education.

The who and the when of screenings will depend on the state and district in which you are working. To find out who needs what screenings and when you can Google “mandated school screenings x state name” It will usually take you to your state department of health where you can see the information regarding mandated screenings. Here is an example of my state department of health website regarding screenings: https://www.health.pa.gov/topics/school/Pages/Mandated-School-Health-Programs.aspx

For now I want to narrow it down to just vision screens (hearing screens will be in another post). For my state, I do vision screens on all students yearly. All students require a far & near visual acuity, 1st graders also get the convex lens test (more about that later), and 1st & 2nd also get color vision and stereo tests. Students that are newly enrolled in the district should have all the tests also.

Equipment

  1. Eye charts: there are multiple kinds of vision screening charts we can use for students of varying ages and abilities. More on those below.
  2. Light box: A holder for the screening charts that has a backlight. Not everyone has access to a light box but they are useful to get the best screening.
  3. Eye occluder: I generally have the student use their own hand to occlude one eye but you can also use the handheld eye occluder paddles if desired. Just be sure to clean them between each student.
  4. Stereo glasses and cards: The stereo vision test is a test of the ability to see 3D images and test for amblyopia, strabismus and poor ocular alignment. This test requires the stereo vision (3D) glasses and the stereo vision (3D image) cards.
  5. Color chart book: to test for color blindness we have a book of shapes made with varying color dots.
  6. Convex lens kit: Convex lens kit usually consists of a pair of +2.25 glasses to pair with the regular far vision charts.

Eye Charts

  1. Snellen: This is the regular letter chart usually used for students who are able to read and recognize letters. The Snellen chart originally consisted of hooked letters as opposed to the Sloane chart that has block letters. The current day Snellen chart now is called a Snellen/Sloane chart as they have changed the letters to all block letters. Snellen is the one with single rows of letters and the red and green lines.
  2. Sloane: The letter chart similar to Snellen but made with block letters instead of hooked letters. It is just a more modern version of the Snellen chart and sometimes called the Snellen/Sloane chart.
  3. Near vision cards: Near vision cards are (as you probably guessed) to perform the near vision test. They are smaller, handheld cards with either letters, shapes or sentences on them. They are meant to be held approx 13-16 inches away to read.
  4. LEA symbols: A chart for younger students who may not be fluent with their letter recognition. This chart has a series of shapes instead of letters. Sometimes it comes with corresponding cards or a single page with the shapes for the student to point to.
  5. HOTV: a simpler letter chart consisting of just the letters H, O, T, and V. This is sometimes used for the younger kids or people who are not fluent in reading.
  6. Tumbling E: Another chart for those who are not fully literate, an alternative to the LEA chart or the HOTV chart featuring “E” in different positions along the lines. The tumbling E chart has a capital letter E in varying positions and sometimes comes with a card or a plastic E so the student can demonstrate the position of the E.
  7. Hands: Similar to the tumbling E chart, the hands chart has a series of hands in different positions. The student can demonstrate with their own hand what position the hand they are looking at on the chart is.

Vision Tests

  1. Far acuity: The most common vision test used to assess for nearsightedness (difficulty seeing things at a distance).
  2. Near acuity: Used to assess for farsightedness (difficulty seeing things that are close up).
  3. Convex lens: A further assessment of nearsightedness, convex lens assesses for severe nearsightedness.
  4. Stereo: To assess for amblyopia, strabismus and poor ocular alignment. This test uses 3D images and 3D glasses to test how the two eyes work together.
  5. Color: tests for color blindness by looking at a series of shapes created from dots of varying colors.

Automated Vision screener: the automated vision screener devices are machines that will perform the vision screenings for you. These are sometimes known by brand names such as the Spot Screener, the Optec Screener, the Pulseoptix, or a few other brand names. They all have varying abilities to test different types of vision. They can be very expensive but if you can afford one for your district they are really helpful. The only caveat is that not all districts legally allow them and require physical vision screens to be performed. Check with your district heads and state health department for your specific state.

Procedures

Check with your state department of education and your district to check for any specific guidelines for screening student’s vision. This information is based on my state’s guidelines and instructions for screening.

Every vision exam should start with a visual inspection of the student’s eyes. Do they exhibit any nystagmus (shaking/movement of the eye), esotropia/exotropia (misalignment of one or both eyes inward or outward), drifting of one or both eyes, squinting, or any abnormal appearance of the eyes. Do they have any history of eye or vision problems?

Are there any language concerns? If so is there a translator available to assist? My teachers are kind enough to send the students with less english down with a student who can translate for them but I also have some in person translators available in my building.

Assess if the student already has glasses or contacts. If they do then they should perform the test with them on. Far vision should be performed with glasses for distance, near vision should be performed if their glasses are for near vision. If they forgot them then they should return at a later time with the glasses. If they are prescribed them but they don’t have any then consult the parent about getting a new pair of glasses. Offer assistance if there is a need.

Far Vision:

  • Determine the appropriate chart for the student based on age, grade, and ability.
  • Have the student stand either 10 feet or 20 feet away depending on which chart you are using (I have a premeasured spot marked on the floor for 10 feet away).
  • Have the student cover the left eye first – if you routinely start with the same eye for every student it makes it easier to record the results correctly.
  • Begin with the 20/40 line. If they pass 20/40 move down to the 20/30, 20/20 and so on. If they can not see the 20/40 line then move up to the larger lines instead.
  • Failure to read more than half the letters/symbols on a line requires moving to the line above until they can read everything on the line.
  • Repeat with the right eye.
  • If you are using the hands or tumbling E chart, instead of asking them to state the letters you will have them use the hand they aren’t covering their eye with the demonstrate the position of the hand or the E you are pointing to.
  • Refer: Any kindergarten or grade 1 student who’s acuity is greater than 20/40 or has greater than a 2 line difference between eyes should be retested and if same results should be referred. Any grade 2 and above student who’s acuity is greater than 20/30 or has a 2 line or greater difference between eyes should be retested and/or referred.

Convex lens

  • While the student is still standing 10/20 feet away for the far acuity test, have them wear the convex glasses, occlude left eye.
  • Starting with the 20/20 line ask them to read the letters/symbols. move up as far as the 20/40 line.
  • If the student can NOT see the lines with the convex lens glasses on that means they PASS the test.

Near vision

  • Have the student occlude the left eye first.
  • Hold the near vision testing card approximately 13-16 inches away from the student and ask them to read the smallest line they can see without squinting or leaning in to the card.
  • Repeat for the right eye.
  • Refer: Any kindergarten or grade 1 student who’s acuity is greater than 20/40 or has greater than a 2 line difference between eyes should be retested and if same results should be referred. Any grade 2 and above student who’s acuity is greater than 20/30 or has a 2 line or greater difference between eyes should be retested and/or referred.

Stereo

  • Have the student wear the polarized stereo vision testing glasses.
  • Show the student the raised “E” figure on the demonstration card at 16 in (40 cm).
  • Tell the student that the raised figure is popping off the card. Show the student the raised “E” paired with the blank card. Ask the student to point to the raised “E”.
  • Repeat this process until you are certain that the student understands and can correctly identify the raised “E”. Once the student understands, start the screening test.
  • Present the cards six times at 16 in (40 cm) and ask the student to point to the “E” on each presentation (shuffle the cards behind your back between each presentation).
  • Refer: Refer if the student cannot identify the “E” correctly in four of six attempts.

Color vision

  • Holding the pseudoisochromatic test cards approximately 30 in (75 cm) away, instruct the student to identify the number, symbol or trail seen on each of the designated cards, allowing for 3 seconds per card.
  • Refer: If the student does not correctly identify the manufacturer’s suggested number of cards, he/she has failed the test.
Check out my TPT for more screening infographics!

Resources

  1. Local Lions club: one of the service projects the Lions Club does is to work with vision screening and obtaining glasses for kids and adults. Some school nurses have been able to schedule vision screening events with their local Lion’s Club.
  2. Vision to Learn: Helps students in low income communities obtain eye exams and glasses.
  3. Local association for the blind: I’ve linked the Pennsylvania Association for the Blind here but Most states also have a chapter.
  4. Local ophthalmology colleges: I’ve linked here a local ophthalmology school that my district uses as an example. You most likely have something similar in your area as well. The local one to me can schedule vision exam events at my school with the ophthalmology students.

For special needs students it can sometimes be difficult to complete the vision screenings depending on their level of disability but don’t neglect them! You can try various things such as the hands and E charts, meet them where they are – literally – if you have to sit on the floor and coax them into trying the exam then do that. If you’ve tried and they are unable then they can be referred to their doctor for evaluation if there are any concerns.

If anyone is an expert in vision screens in school or has any great resources or info to add please follow and message me or comment here and let me know what you think!

References

https://www.health.pa.gov/topics/school/Pages/Vision-Screen.aspx

Assessment Basics for the School Nurse: Sore Throats

Sore throats: everyone seems to have them at the same time. What’s causing them, what are we looking for and what can we do about it?

Sore throats can be benign much of the time – from post nasal drip, too much talking, allergies, environmental irritation, or random unnamed viruses. But at times they can be worse than a run of the mill cold – strep throat, tonsillitis, mono, Coxsackie/hand-foot-mouth, flu, Covid, or even chickenpox or epiglottitis.

Equipment needed

  1. Tongue blades
  2. Flashlight/pen light
  3. Table salt/water/cup

Throat assessment

  1. Asses external appearance: do they have any injuries, swollen glands, drooling/difficulty managing their own saliva, swelling of the mouth or face?
  2. How does their voice sound? scratchy, hoarse, whispering, muffled “hot potato” voice?
  3. Assess for fever.
  4. Using light and tongue blade, have the student open their mouth and stick their tongue out. Gently push down on the tongue to visualize the back of the throat and tonsils. It helps if the student can say “ahhhh” as this causes the tongue to lower giving better visibility to the back of the throat.

Things you may see on exam

  1. Enlarged tonsils: tonsils appear swollen. In some cases they are so swollen they are touching.
  2. Tonsillar exudate/white patches/pus: With certain tonsillar ailments the tonsils can have white patches, white spots, pus, and have a “raw hamburger” appearance (sorry for the visual).
  3. Post nasal drip: I have never been good at spotting post nasal drip but doctors seem to see it all the time. Post nasal drip can cause a sore throat, especially in the morning when you first wake up and the mucus has been sitting there all night.
  4. Deviated uvula: The uvula is not hanging in the middle like it is supposed to. This can be an indicator of a peritonsillar abscess which is an emergency. In a peritonsillar abscess the uvula will deviate away from the side where the abscess is. Deviated uvula can also be an indicator of cranial nerve damage which is also potentially an emergency.
  5. Erythematous tissue: Redness in the throat and tonsils. This is an indicator of an inflammatory process like tonsillitis, irritation from increased coughing, or a viral process.
  6. Red spots to throat and/or roof of mouth: Petechiae in the mouth can be an indicator of a blood disorder or mono; red spots can also be an indicator of strep, hand foot and mouth, or oral thrush.
  7. Ulcers or canker sores: These look like a whitish concave area inside the mouth or around the throat. can be caused by minor injury (like getting poked with a pointy chip), eating too much salt or sugar, hand foot and mouth disease, or even a herpes simplex outbreak.
  8. Dental: The student may have some dental caries or fractured teeth that is referring the pain backward to the throat or causing general mouth pain.

Images of throat exams

Scroll by fast if these might gross you out!

Strep throat
Petechiae in the mouth
Deviated uvula
Enlarged tonsils

In the health room

  1. While there isn’t a whole lot we can do about sore throats at school, there are a few things you can try like gargling with warm salt water, popsicles or freezies, sucking on ice.
  2. In some schools/districts Halls or throat lozenges are permitted to be given by the nurse. Check your district guidelines before dispensing throat lozenges or allowing self carry of throat lozenges.
  3. If sore throat is accompanied by fever then the student should be sent home.
  4. If exam shows any of the above issues, or any other concerns, call parent to report.
  5. Symptoms of strep throat can include not only a sore throat with swollen tonsils and exudate but also stomachache, headache, nausea, vomiting, fever, and a red “sandy” rash on the trunk. The student should be evaluated as soon as possible.

Tips and tricks

  1. gargling with salt water is often very helpful. Try adding 1/4 teaspoon or so of table salt to some warm water, mix it up and have the student gargle a little bit with it.
  2. Cold liquids, popsicles or freezies are great for temporary sore throat relief.
  3. Tea and honey can relieve a sore throat. Honey has antiviral and antibacterial properties and can help fight illness. Remember to never give honey to anyone under 12 months old due to the potential for infant botulism.
  4. Allergy medicine or decongestants: If the sore throat is caused by post nasal drip or a cold then trying something that will dry up excess mucus might help. This wouldn’t be given at school but the parent can consider this for home.
  5. Motrin or Tylenol: I prefer to use these sparingly and try other things first but they can certainly help with a sore throat. Ibuprofen is better than Acetaminophen for inflammation.

When is it an emergency?

  1. When there is difficulty breathing: If the student has a sore throat and difficulty breathing this could be a sign of anaphylaxis. Check a pulseox, auscultate lungs for wheezing, assess for swelling in the mouth, assess for known allergies. If anaphylaxis is suspected use your anaphylaxis action plan and give Epi and call 911.
  2. When there is real difficulty swallowing or managing saliva: Tonsils are so swollen that the student can not swallow their saliva. This can be an indicator of mono, peritonsillar abscess, strep throat and causes the risk of aspiration and compromised airway.
  3. Deviated uvula: The uvula is not hanging in the middle like it is supposed to. This can be an indicator of a peritonsillar abscess which is an emergency. In a peritonsillar abscess the uvula will deviate away from the side where the abscess is. Deviated uvula can also be an indicator of cranial nerve damage which is also potentially an emergency.

At the end of the day, we of course can’t diagnose anything but we must know when to refer out for further assessment and treatment.

Please feel free to follow for more assessment tips and comment if you have anything to add!

References

https://my.clevelandclinic.org/health/body/22674-uvula#:~:text=A%20deviated%20uvula%20is%20one,away%20from%20the%20infected%20tonsil.

https://www.medicalnewstoday.com/articles/324876#prevention

https://www.mayoclinic.org/diseases-conditions/sore-throat/symptoms-causes/syc-20351635#:~:text=The%20most%20common%20cause%20of,with%20antibiotics%20to%20prevent%20complications.

https://www.entandallergy.com/blog-posts/details/16-best-sore-throat-remedies-to-make-you-feel-better-fast-according-to-doctors

Assessment Basics for the School Nurse: Ears

Something I think many school nurses struggle with – myself included – is looking in ears. What are we looking at in there and why does it matter when RNs can’t diagnose or prescribe anyway?

Well we can certainly look and assess and determine if the student needs to have further evaluation at the doctor or not but no, we can’t diagnose the ear infection or prescribe antibiotics; nor can we clean out the wax in a school health room setting.

Good otoscopy requires lots of practice to know what you’re looking at. My first piece of advice is to look in every student’s ears that it is convenient to so you can get a good handle on what it might look like in different ages and sizes and different states of health.

Some reasons we might need to check a students ears might include: ear pain, difficulty hearing, failure of audiogram hearing screen, sensation of foreign body, noted drainage or bleeding from ear, or injury to ear.

Equipment needed for examination

  1. Otoscope: The Welch-Allyn is your best bet for a solid otoscope. You can find many styles of Welch-Allyn to meet your needs. I also have a digital otoscope with a screen that I’m still learning to use so the jury is still out on whether it is a good investment or not. Make sure that whatever scope you get that you have extra batteries and bulbs for it.
  2. Otoscope speculae: You should have a supply of disposable speculae for your scope in multiple sizes depending on the size of the patient. They are mostly universal but make sure they fit your scope before buying.
  3. Ear-ease or rice pack for heat therapy: This is a cool little tool that helps put moist heat on an earache. People swear by it. If you don’t have an ear-ease you can just make a rice pack with a baby sock and some rice – sprinkle a little water on it and microwave it to make it warm (not hot!).
  4. Audiometer: If the student’s issue is hearing loss then you may want to check their hearing as part of the ear exam. Audiometers can be purchased through school nurse supply companies such as schoolhealth.com or schoolnursesupplyinc.com.

Steps to performing an ear exam

  1. Examine the outside of the ear first. Do you note any drainage, bleeding, redness, lesions, or swelling? Is there a piercing that needs attention? Bug bites, scratches, etc?
  2. Observe the face around the ear noting if there is any swelling, lesions, redness or drainage to the corresponding eye, jaw, cheek, neck and mastoid area. This can be an indicator of mastoiditis, a progression of inner ear infection.
  3. For a child you will want to pull the pinna (outside part of the ear) straight back. For an adult or teen you will want to pull the pinna up and back to straighten the ear canal. In children the ear canal curves inward but as a person grows the ear canal begins to curve more upward.
  4. Insert your otoscope speculum with the light turned on.
  5. You may have to move around a bit to get a good look at the inside of the ear. Reposition the pinna if needed by moving it up, back and down until you can see in the ear canal.
  6. Observe the ear canal for excessive wax (some wax will be normal). Do not attempt to remove wax if it is occluding.
  7. Observe the ear canal for redness, bleeding or discharge, or foreign objects.
  8. Observe the tympanic membrane (TM) for redness, inflammation, leaking of fluid, bulging, myringotomy tubes, or perforations. Typically the TM should be mostly flat, gray, kind of shiny, and somewhat translucent.
  9. Document what is observed and call parent with any concerning findings.

Things you may see on exam and what to do about them

  1. Earwax occlusion: earwax blocking the ear canal. Do not attempt to remove the earwax, removal should be performed by the physician or under a physician’s supervision. If the student has ear pain but you can’t see enough to determine if there is anything wrong you are safest to just call the parent and let them know and they can have the doctor manage it.
  2. Fluid in ear: this can be difficult to see at times but you might see a few bubbles behind the TM. Sometimes if there is a lot of fluid it can cause the TM to bulge out and you can see the line of fluid behind the TM. Fluid in the ear can be caused by allergies, a cold virus or an ear infection.
  3. Possible infection aka acute otitis media or AOM: possible/probable ear infection can cause the TM to appear red, inflamed, and possibly have fluid or pus behind it. Since we can not diagnose or treat this we must refer the student to the doctor to be examined and treated.
  4. Swimmers ear aka otitis externa: Inflammation/infection in the ear canal outside of the TM. Usually it will hurt when you attempt to move the pinna to look in the ear. It will appear red or inflamed to the walls of the ear canal. Ask the student if they have been swimming or submerging their ears in water any time recently or if they have suffered any foreign bodies recently. Again, if noted, this needs to be further evaluated by a physician and treated as they wish.
  5. Ruptured or perforated eardrum: a hole in the TM usually from a buildup of fluid and pressure. You may see the tear or hole or you may see leakage of fluids. This often is accompanied by intense pain and then sudden relief when the pressure has subsided. This requires a phone call home and a trip to the doctor for further evaluation.
  6. Abrasions: If the student is sticking anything in their ear and scratching the ear canal they may have abrasions or scratches and some minor bleeding present. Just leave it alone and advise the student to refrain from placing anything in ears going forward. Note any signs of infection related to the wound and call home if needed.
  7. Myringotomy tubes: Often the tubes will remain in place for a few years but on occasion will migrate out and fall out. You may see intact tubes in the TM or you may see a tube embedded in wax or just sitting there in the ear canal. Just leave it alone and document. Let the parent know that you noted the tube has fallen out so they can have it addressed if needed.
  8. Foreign body: Kids do the darndest things. You might find anything in the ear from wads of tissue, cotton from q-tips, or bugs to pills, beads, berries and tiny legos. If a foreign body is noted call the parent to have them evaluated at the doctor. Do not attempt to remove the foreign body unless it is close to the outside and easy to grasp and remove.
  9. Infected piercing: If there is a piercing on the ear that shows signs of infection such as acute pain, redness, swelling, or drainage the student needs to be evaluated by the doctor. Do not remove the piercing but clean gently around it if possible. If there is irritation from an earring get a parent’s permission first to remove the earring and clean the piercing. Do not put the earring back in, place it in a small zip lock bag and send it home.
Examples of tympanic membrane disorders
Fluid behind the eardrum

In the health room

  1. As I mentioned, as RN’s in an autonomous setting such as a school health clinic, we don’t have the ability to diagnose or treat findings on an ear exam. It is important that we call the parent or guardian with any findings and impress on them that the student should see the doctor for further evaluation. You can report to the parent what your observations are but avoid stating things such as “they have an ear infection” because that would be assigning a diagnosis. Instead try letting them know that the student has ear pain and it appears red and inflamed inside so they need to be evaluated further by the doctor to determine treatment.
  2. Practice makes perfect. Look in as many ears as you can so you can get an idea of how they should look and what is abnormal.
  3. Never perform any procedures such as earwax removal, ear lavage, or foreign body removal in the health room. Any procedures to the ears aside from general exam should be performed by the doctor or under a doctor’s supervision, NOT at school.
  4. Google is your friend! There is nothing wrong with pulling up pictures of eardrums on Google so you can compare what you see with some images of various ailments.
  5. Educate your students when appropriate. Make sure they know that they should never put anything in their ears including q-tips. Make sure they know not to try and dig out wax themselves. Parents should also avoid using q-tips and removing wax and refer to the doctor if there is a concern.

Tips and tricks

  1. Ear-ease or moist heat: The ear-ease is a cool little tool that uses warm water over the ear to help relieve some ear pain with moist heat. You can get it from Amazon or some of the school nurse supply companies. Alternatively you can make a heat pack using rice and a baby sock: put the rice in the sock and tie it closed. When you need to use it sprinkle some water on it and warm it up in the microwave for a few seconds. Avoid burns by making sure to knead it well and ensure it is not too hot before using it on a student.
  2. Not all ear infections require antibiotics. Some are viral or allergic in etiology and can be remedied by using decongestants and supportive care.
  3. Tylenol or Motrin: Tylenol or Motrin can of course help in a pinch to relieve pain but will not get to the root of the problem.
  4. Decongestants/cold medicine: Decongestants can help relieve fluid and pressure in the ear caused by colds and allergies. This should be reserved for the parents to give at home unless they have appropriate doctor’s orders to be given at school.
  5. Chewing gum: chewing motion can help relieve pressure in the ears by helping them “pop”.
  6. People have been known to use warm (not hot) olive oil in the ear to relieve ear pain. This should be reserved for home and not performed by the school nurse.
  7. Another home remedy for ear pain is to use a few drops of onion juice in the sore ear. Apparently the quercetins in onions have antiinflammatory properties and can help with minor earaches. Alternatively one could use ginger juice, garlic oil, tea tree oil, or oil of oregano for relief of inflammation. Placing anything in the ear should be done at home by the parent or under the doctor’s supervision, not the school nurse. This should be avoided if the person has a perforation or myringotomy tubes. Note: these remedies are not medically proven and may carry risk.

When is ear pain an emergency?

  1. When it is accompanied by a penetrating injury ie: stuck a pencil in the ear and poked the eardrum. Call the parent to have evaluated ASAP.
  2. When is is accompanied by a real head injury. Assess the head injury and call the parent to have evaluated. Call 911 if the injury is severe.
  3. When they do not have tubes but they have fluid or blood leaking out. This can be an indicator of an acute perforation or a head injury and should be evaluated ASAP.
  4. When there is a foreign body in the ear.
  5. When it is accompanied by a fever. Call parent to have evaluated.
  6. When it is accompanied by acute hearing loss, dizziness/vertigo, or extreme sharp or throbbing pain.

If you have anything to add to ear assessments please feel free to follow and comment! I would love some experts to weigh in.

References

https://ppemedical.com/blog/how-to-perform-a-thorough-ear-examination/

https://www.ebmconsult.com/articles/otoscope-examination

https://www.ncbi.nlm.nih.gov/books/NBK553163/

https://www.gohealthuc.com/library/earache-remedies

https://kidshealth.org/en/parents/otitis-media.html?ref=search

Assessment Basics for School Nurses: Orthopedic Injury

This post contains affiliate links which means we earn a small commission if you purchase through these links.

Something I think many school nurses might struggle with is orthopedic assessment. Someone comes in crying with an injury but how do we know what we might be working with and what we should do about it?

The most common types of orthopedic injuries that we would see with kids at school are of course broken bones, sprains and strains, shin splints, ACL injuries, and traumatic brain injuries (TBI, concussions). Concussion is a conversation for another post but we will go over some basic possible fracture assessment for this post.

Despite what many people think, nurses do not gain x-ray vision in nursing school.

Common types of fractures

  • Non-displaced: the bone is cracked but stays aligned.
  • Stress: Small cracks in the bone usually from repeated stress such as running or gymnastics.
  • Buckle: Not a true fracture but happens when the bone is compressed such as a fall on an outstretched hand and the bone bends and causes injury but does not break.
  • Displaced angulated: Full break, bones are out of alignment and on an angle.
  • Displaced translated: Full break, bones are out of alignment with each other but not angled.
  • Displaced Rotated (spiral): Full break, bones moved in a twisting motion when breaking.
  • Displaced greenstick: Partial break, one side breaks and the other side bends much like bending a fresh stick from a tree.
  • Comminuted: Full break, bone is in multiple pieces.
  • Compression: Like a buckle fracture, bone is compressed hard enough to collapse in on itself. This can happen from falling on outstretched hands, falling from a high height and landing on feet, or a car accident when the passenger’s feet are up on the dashboard.
  • Open: Fracture that involves the bones breaking through the skin.
  • Closed: Fracture that does not break the skin.
  • Growth Plate Fracture: A break in the bone over the growth plate in children.

Common pediatric fractures:

(Links on each area to the Boston Children’s Hospital patient education forms) found here: https://www.childrenshospital.org/conditions/fractures

Shoulder, upper arm

Elbow

  • occult elbow injury: A possible fracture to the elbow but is too difficult to see on x-ray.
  • olecranon fracture: Fracture of the pointy part of the elbow, part of the ulna (one of the two forearm bones).
  • medial epicondyle fracture: Fracture of the bottom of the humerus, in the elbow joint, on the inside part of the arm.
  • lateral condyle fracture: Fracture of the bottom of the humerus, in the elbow joint, on the outside part of the arm.

Forearm

Hand, wrist

Lower leg

Ankle, foot

  • ankle fracture: Fracture of the lower part of the tibia or fibula closer to the foot.
  • metatarsal fracture: fracture of the bones inside the foot that attach to the toes.

Symptoms of a possible fracture:

  • Pain: pain can sometimes be referred to an area other than where the actual fracture is ie: hip fracture can present as pain to upper leg. Supracondylar humeral fracture can present as pain to elbow and forearm.
  • Swelling: Edema to area surrounding injury.
  • Obvious deformity: Sometimes fractures don’t always “look broken” but other times they look really broken. Obvious deformity requires x-ray.
  • Difficulty moving limb or area in question: Range of motion may be decreased, inability to move limb or area in question without pain. In severe cases we won’t ask the patient to move the limb to assess but sometimes decreased ROM is obvious.

How to assess possible fractures

  • Mechanism of injury including height of fall: What caused the injury? Did they fall from standing? Fall off a structure?
  • Strength and Range of motion: Depending where the injury is located and how severe, assess if the person is able to move the area or not. Do they have pain when moving the area?
  • Bruising
  • Swelling
  • Erythema
  • Deformity: Is there an obvious area of deformity from the injury? Is the bone or limb bent at an abnormal angle?
  • Capillary refill: We are concerned about blood flow to the area if it is an arm or leg that is injured. Check capillary refill to assess for any compromise in blood flow.
  • Distal pulses: Check pulses below the injury to assess compromise to blood flow.
  • Distal sensation: Assess the level of sensation to the area below the injury. Can they feel your touch like normal? Not at all?
  • Distal temperature: Assess the temperature of the limb below the injury. If it is cold or cool they may have a compromise in blood flow. Heat at the injury site can also be an indicator of a fracture.
  • Pulseox: Check the pulseox if the injured limb is an arm. This is also to assess compromise of blood flow.
  • Assess for other injuries: Check for other injuries such as head trauma, abrasions, bleeding, other possible fractures, or bruising, and address them as appropriate.

What to do with a possible fracture

  • If fracture is suspected call the parents immediately. Call 911 depending on the severity of injury.
  • Splinting: We aren’t splinting like they do in the ER but we do need to immobilize for comfort to get the student to to the ER for evaluation. This can be in the form of a pre-formed plastic splint and an elastic wrap, or even a cardboard splint and elastic wrap. The goal is stabilization and immobilization to prevent further injury. Alternatively, if injury is severe and splinting will cause more damage, do not move the person to splint, keep them comfortable and still until EMS arrives to take over.
  • Ice: Ice will help reduce swelling and inflammation, can potentially decrease some discomfort as well.

In the Health Room

We have all been in a position where we have missed a fracture because it didn’t seem so serious when the student was in our office. Sometimes they don’t cry, they don’t have a ton of pain, they don’t have any obvious signs that would indicate a broken bone. I have learned the hard way to always report the injuries to parents even if it doesn’t seem serious. Give them a heads up that the student got hurt and while it seems ok right now the potential exists that it could change and require a medical evaluation. Write a note home, call them, send a text or a classdojo message, whatever it takes.

As I stated previously, we don’t receive our x-ray eyes in nursing school, we don’t know if something is broken or not without an x-ray.

Make sure you lay eyes on the injury even if it seems trivial. Take off the shoe, pull up the pant leg, take off the jacket and confirm the appearance of the injury.

Document the situation and assessment.

When is a possible fracture an emergency?

All possible fractures should be addressed emergently but some may require EMS attendance as opposed to waiting for a parent to transport to the ER.

  • If the injury is caused by a major trauma like a fall from a structure
  • If there is bone sticking through the skin.
  • If the person is unable to move or you can’t move the injury without causing pain.
  • If the injury involves the spine, neck, head or back.
  • If the person is unresponsive
  • If there is bleeding that can’t be controlled.
  • If there are weak or absent pulses or neurovascular exam indicates compromise.

Check out these system assessment documentation forms on Teachers Pay teachers: https://www.teacherspayteachers.com/Product/School-nurse-health-assessment-forms-bundle-8525470

References:

As featured in Feedspot’s top 100 nursing blogs!

Can We Change This Narrative That Teachers Can’t Be Our Allies?

I’ve been watching a lot of posts on social media about school nurses being annoyed when the teachers suggest things that may be wrong with a student or suggest what they think the student needs.

The complaints of teachers feeling foreheads and sending a student to have their temperature checked, teachers noting that a student “looks sick”, teachers suggesting that so-and-so “needs ice” for an injury seem to throw some school nurses into a tailspin of upset that the teachers are “out of their lane”.

I am the school nurse and my literal job is to be here checking temperatures and assessing illness and injury and responding accordingly. My education is in nursing (and a little bit of teaching too) so I feel confident that I can assess students’ health concerns on a daily basis. I’m the one who is supposed to be using my nursing judgment to make health decisions in the school.

Treat teachers like allies, not enemies.

But are we truly so arrogant as healthcare providers that we can’t recognize that we are a team? I’m not spending most of my days with these kids, the teachers are. They see them all day every day and know them well enough to know if they aren’t well. Many of them are already parents and are capable of determining a warm forehead or a fake sickness complaint versus a real sickness, or drama versus real pain from an injury. Many of them have also been teaching for many years and know kids well enough to determine if they need some nursing attention or not.

If a teacher sends a kid with a hall pass that states their temp is 99 (either because they are guessing or because they have a thermometer and checked) is it really the end of the world? You can still give your nursing recommendation and move on. They are still being sent to you to assess and it doesn’t change your recommendation if they guess at a temperature. If the teacher has a thermometer, thank them for taking the time to triage the student and trying to keep them in class. After all, that is our common goal isn’t it?

Personally, I welcome the teachers’ input about the students. Often they are the ones that the students choose to speak to. They are the ones that might be seeing parents at pickup and talking to them. Most teachers get to know their kids and families well and are a great resource for the nurse.

I welcome teachers taking the initiative to help the students. Sure, I’d like to be the one to make the call if someone should go home sick since it is my job and all so there are of course some boundaries to be observed but that is something that can be discussed and easily remedied if that is an issue for you. I have teachers that are happy to text a parent or call because they have a relationship with them already, I don’t mind but would appreciate a heads up in the case that they do. In fact, this happened today when I stopped in a classroom and the teacher offered to call the parent for me. I appreciated it because that took a task off my plate leaving me with time to do other things.

Communicate, educate, collaborate. Everyone works together.

We need to have an open line of communication between the nurses and the teachers. There is no reason that the procedures can not be amicably discussed and an agreement reached. We need to understand their position in wanting to help the students and they of course need to understand our position of trying to do our job.

It’s never too late to establish ground rules that everyone can work with. Inform the school staff that they are welcome to call parents if they want to but please inform you if they are going to do that. As a nurse we know that we need to document all situations that we are involved with. If something comes back to bite anyone it should be documented for you to refer to.

Ask that they send sick kids to you instead of just sending them home – after all, this is what I’m here for. Keep the lines of communication open: if the teacher feels that the student needs to go home or be seen for whatever reason then have a conversation about their concerns and come to an agreement. Part of our job is educating, teachers and staff included. If after you’ve discussed and they have been educated they decide to continue the same actions then kiss it up to god and let it go. I’m rarely one to say things are “not my problem” but there comes a time where you have done what you can and now you step out of it.

At the end of the day communicate, educate, collaborate. Everyone works together for the good of the kids.

Headaches

Headaches: another enigma, maybe second to tummyaches. What causes them, and how do we manage them at school?

Headaches are literally a pain in your head or face. More specifically, a headache is an activation of nociceptors (a sensory receptor for painful stimuli) in and around the layers of tissue of the brain. These nociceptors can be activated by many different stimuli including tension, increased blood flow, grinding teeth, poor sleep, nasal and sinus congestion and much more!

Fun fact: your actual brain does not feel pain, the sensory receptors are only present in the meninges, not the actual brain tissue which is why they can do brain surgery without causing pain.

Causes of headaches

Some most common causes of headaches are (this is not an exhaustive list):

  • Tension/stress: most common in children and young adults, caused by the muscles in the head and neck tensing up and activating the pain receptors. Tension/stress headaches usually feel like a squeezing or pressure, pounding, generally constant and all over the head or radiating down the neck. While uncomfortable these headaches are not dangerous. They can generally be relieved by over the counter medications like Ibuprofen, Acetaminophen or Naproxen.
  • Poor sleep: lack of sleep can cause both tension headaches or be a migraine trigger. Poor sleep can activate the nociceptors causing headaches. Fatigue can cause poor posture and muscle pain leading to tension type headaches.
  • Poor diet: low sodium and potassium can cause a headache so if you’re dieting or maybe just were too busy and skipped a meal you might find yourself with a headache. From personal experience I’ve also found that eating too low carb causes headaches (yeah I tried that keto diet for about a year and had raging headaches the whole time!) Also lack of caffeine, if you’re a true coffee addict, can definitely cause a headache: caffeine narrows the blood vessels surrounding the brain which helps reduce headaches cause from increased blood flow. Decreased caffeine means increased blood flow which equals headache. This is also how/why Excedrin works!
  • Dehydration: as mentioned above, low sodium can lead to headaches, but also when you’re low on fluids in general your brain tissues can shrink which puts pressure on the nerves around your brain causing pain. Keep your brain nice and plump!
  • Poor posture: poor posture causes tension in the back and neck which can lead to pain in the back of the head and neck.
  • Nasal and sinus congestion/colds: If you have inflamed or congested sinuses they are causing pressure on the brain, eyes and facial area which will cause a frontal headache.
  • Hormones: drops in estrogen levels can cause a headache and are linked to migraines. For those that menstruate, you might find that right before your period when there is a drop in estrogen you have headaches. For those who are perimenopausal or menopausal you may struggle with headaches due to lack of estrogen production.
  • Eye strain/screen time: Making your eyes work too hard whether from too much screen time or not wearing your glasses makes the eye muscles contract too much activating the pain receptors in that area. It’s important to take breaks from screens periodically and always wear your glasses. It’s also important to have regular eye exams to ensure that your glasses prescription is up to date if applicable.
  • Elevated blood pressure: this gives an all over pounding pulsing headache.

Types of headaches

  • Migraine: A migraine is a headache that can cause severe throbbing pain or a pulsing sensation, usually on one side of the head. It’s often accompanied by nausea, vomiting, and extreme sensitivity to light and sound. Migraine attacks can last for hours to days, and the pain can be so severe that it interferes with your daily activities.
  • Tension: most common in children and young adults (and school nurses!), caused by the muscles in the head and neck tensing up and activating the pain receptors. Tension/stress headaches usually feel like a squeezing or pressure, pounding, generally constant and all over the head or radiating down the neck. While uncomfortable these headaches are not dangerous. They can generally be relieved by over the counter medications like Ibuprofen, Acetaminophen or Naproxen.
  • Cluster: Cluster headaches, which occur in cyclical patterns or cluster periods, are one of the most painful types of headache. A cluster headache commonly awakens you in the middle of the night with intense pain in or around one eye on one side of your head. Bouts of frequent attacks, known as cluster periods, can last from weeks to months, usually followed by remission periods when the headaches stop. During remission, no headaches occur for months and sometimes even years.

Assessment

When a student complains of a headache at school you will need a little bit of information about what’s going on so you can decide how to adequately treat their symptoms.

  • Where does it hurt exactly? This can help you pinpoint better what type of headache they are having and if it might be related to poor vision, not wearing glasses, new onset of a cold, or maybe ear pain mistaken for headache pain.
  • What were you doing when it started? Were they in a loud room? Straining to see the board in class? Getting ready to take a test or do a task they don’t want to participate in? Doing strenuous physical activity? Is it superficial pain from a new injury?
  • Are there any cold symptoms or fever present? We know that nasal and sinus congestion can cause a headache, and a fever will very likely cause a headache also. Definitely check a temperature to be sure.
  • Does the student have a history of headaches or migraines? If they have a history of headaches or migraines you may already have an action plan for them to treat their headaches.
  • Does the student have a recent history of head injury or concussion? If they are post-concussive they are likely to suffer from headaches for a few days or weeks. You should have an action plan of some sort for this already.
  • Has the student eaten or drank fluids today? if so what fluids? As we know now, not eating and dehydration are our biggest culprits for headaches. If the only fluids they had today was soda or coffee then they could still be dehydrated because caffeine dehydrates you (even though it can also help a headache, it could also cause the headache).
  • Are they on any medications or had any medication changes that might cause headaches? Some medications can cause headaches such as SSRIs like Zoloft when first started. Others like Adderall or ADHD stimulants can raise blood pressure causing a headache as well. Additionally, you want to make sure they haven’t already taken something that would interact with medicine you might give them.
  • Check a blood pressure: elevated blood pressures can cause a pounding headache, especially if they don’t normally have high blood pressures.
  • If applicable, is the person using alcohol or illicit drugs and are they possibly hungover?

What can you do about headaches at school?

  • W.O.W: Water, Oxygen, Wait. have the student drink some water – like 8 ounces or more. have them sit down and take about 10 slow deep breaths. have them wait about 30 minutes and see if things have improved or not.
  • Hydration: The student needs to be sure to drink lots of water. Alternatively, Gatorade/Powerade, sports drinks and juice with sugar in it can help with hydration. It also helps to have a little bit of salty food along with the water (assuming it’s not blood pressure related) because water follows sodium so you will retain the fluids if you add a little salt (that’s why Pedialyte tastes like salty juice)
  • Eat a balanced meal: They need to eat! A balanced meal that includes vegetables/fruits, carbs, and something with sodium and potassium would of course be ideal but anything will do even if it’s just crackers.
  • Have them lie down in a quiet dark room for a bit and relax. You can even show some deep breathing or meditation techniques for relaxation.
  • OTC meds: Try Ibuprofen or Acetaminophen as directed by standing orders and/or parents permission. You want to know if they have already had any other medications like Dayquil, Ibuprofen or Acetaminophen already so they don’t accidentally have too much. make sure they don’t have an allergy to those medications. make sure you have appropriate consent to give those medications. If the student has an empty stomach be sure to have them eat something along with these meds to avoid upset stomach.

When do you need to worry about a headache?

  • Thunderclap headache: a sudden onset of severe head pain not associated with a new injury. It is indicative of aneurysm rupture or bleeding in the brain and you should call 911.
  • Headache accompanied by extremely stiff neck and fever: this is indicative of possible meningitis and needs to be addressed immediately.
  • Headache associated with loss or change of consciousness: This can be indicative of many things such as a stroke, a head injury, or an aneurysm rupture. This is an emergency and you should call 911.
  • Headache associated with head/neck injury: A severe head injury or neck injury should be addressed emergently.

Headache hacks

  • W.O.W as listed above: Water, Oxygen, Wait. have the student drink some water – like 8 ounces or more. have them sit down and take about 10 slow deep breaths. have them wait about 30 minutes and see if things have improved or not.
  • Salt: If attempting to hydrate have the person eat something like potato chips or pickles along with the water. As I mentioned, water follows sodium and their body will retain the fluids better with some sodium on board. Just be sure that headache isn’t related to high blood pressure as this will make blood pressure worse.
  • Tapping: There is tons of literature for EFT tapping for headache relief but in a nutshell sit in a quiet, dark room and with one or two fingers from each hand firmly tap 10 times above the eyebrow, on the temples, below the eyes, near the TMJ, then on top of the head. Repeat this cycle a few times while also trying to breathe and focus on the tapping. Here is the video I like for this: https://www.youtube.com/embed/htDzY6kmau8
  • Acupressure: take your thumb and forefinger and push them together. in the middle of that area there will be a slight bulge of muscle. Take your other and and squeeze that spot for a few minutes. There are devices that also help with this that look like a little clip that you put on there to give the pressure.
  • Ice: some people love a good ice eye mask or headache helmet. Personally I feel like it makes my headaches feel worse so I avoid but worth a try!
  • Peppermint oil or other menthol oils: mixing peppermint essential oil with a carrier oil and applying it to the temples can help with a headache. Also, inhaling any sort of menthol type of oil can help clear sinuses. This isn’t something for nurses to use at school though as there may be allergies or sensitivities to these items.
  • Horseradish. Not kidding! Just smelling it can clear the sinuses and open nasal passages. They even make a nasal spray with horseradish and cayenne pepper (I do NOT recommend unless you’re very brave because it kind of hurts a lot but it works!)
  • If you are a chronic migraine or headache sufferer like myself, you are probably willing to try literally anything to get rid of a headache. Here is an article outlining all sorts of things you could try: https://www.healthline.com/health/migraine-herbal-home-remedies-from-around-the-world#butterbur

https://www.lindora.com/faq/what-can-i-do-to-prevent-headaches-while-dieting-for-weight-loss/#:~:text=Low%20Sodium%20%26%20Potassium%20Can%20Cause,sodium%20levels%20get%20too%20low.

https://www.mayoclinic.org/diseases-conditions/tension-headache/in-depth/headaches/art-20046707#:~:text=It’s%20not%20a%20coincidence%20%E2%80%94%20headaches,in%20children%20and%20young%20adults.

https://www.brainfacts.org/ask-an-expert/if-the-brain-cant-feel-pain-why-do-i-get-headaches#:~:text=In%20some%20situations%2C%20chemicals%20released,migraines%20are%20considered%20vascular%20headaches.

https://my.clevelandclinic.org/health/diseases/9639-headaches

https://www.healthline.com/health/lack-of-sleep-headache#sleep-and-headaches

https://www.lindora.com/faq/what-can-i-do-to-prevent-headaches-while-dieting-for-weight-loss/#:~:text=Low%20Sodium%20%26%20Potassium%20Can%20Cause,sodium%20levels%20get%20too%20low.

https://www.ncbi.nlm.nih.gov/pmc/articles/PMC5784553/

https://www.mayoclinic.org/diseases-conditions/chronic-daily-headaches/in-depth/headaches/art-20046729

Customer Service as a School Nurse

A school nurse recently posed a question asking how she can learn to better communicate with parents and staff in a school setting and the conversation of “customer service as a nurse” came up. Communicating with parents, students, and coworkers is a huge part of being a school nurse, and even as a nurse or healthcare worker in any aspect. Agree or not but we are in fact a service industry and we are highly trained professionals here to help other humans get through whatever issue it is they are trying to get through. Our job is to help people and meet their needs.

I’ve also somehow landed on the side of TikTok where people are posting about their perceived bad experiences with healthcare and what they think doctors and nurses are doing wrong and it’s driving me nuts! Doctors not giving the medicine they ask for or the tests they think they need or not admitting them for the issue they think they have. Some even mad because they think they aren’t being monitored correctly, or they see the nurse dealing with something like documentation and think they are “ignoring” them, or people who want to dictate their care based on poorly researched ideas. They have no idea what’s happening or they have an expectation based on their “research” and when it isn’t what they expected they are upset.

I am all for people advocating for themselves – everyone should educate themselves about their own treatment courses and know about what medications they are taking and tests they are being submitted to. Everyone has the right to refuse (most) things, and they have the right to ask all the questions they need to before agreeing to anything. It’s difficult because while Google may give you specific answers about what certain lab or test results might mean, the doctors and nurses are trained and educated for years to interpret those things specific to the patient and the situation so things might not be what they think.

My initial thought on that is “oh but they just don’t know how things work so they complain because they don’t understand” which is all true but also there’s so much more to unpack with that.

An amazing response from another nurse to the question of “how can I learn to communicate better?” was that people just want to know what to expect. This rings true on so many levels. This is exactly the key to good communication with your patients, families and coworkers.

Nurse Noah Wiggins summed this up so perfectly I had to share:

“This is an interesting topic. While I have only been an RN for about a year, I was in customer service and management for the automotive industry for many years. In fact, it’s part of why I chose to make the shift into nursing. I have always noticed the comparison of nursing and customer service. Sadly, when I have told fellow nurses and administration that in realty nursing and healthcare is basically a combination of Customer Service and Skilled Trades (the skill being the nursing) people often get offended. As if that somehow belittles their role or education. When in reality it is a very accurate analogy. We have to wear so many hats as nurses but at the end of the day that patient is our customer and if healthcare treated patients like customers that have a choice, they would receive much better care. All that said I will share something I learned in the auto industry that is use every day in my nursing practice from a man named Jeff Cowan. “People want to know what is going to happen, or what might happen. If they do, they will be completely satisfied.” If people know what is going to happen or what might happen, they can make plans. I cannot think of an industry that this is truer than healthcare. We cannot assume that people know what we know, and we have to realize that there is a lot of mistrust in the public for healthcare, that if we are being honest is justified in many cases. So, over communicate, advocate, educate, set a standard and expectation, empathize and do not get hung up on the tasks of nursing over the people. This is a people business, and they have to come first.”

I used to get so annoyed when I would read the Press-Gainey reviews and comments when I was an ER nurse and labor nurse. There were so many complaints about things that patients just didn’t understand – having to get stuck multiple times for an IV or blood draw, having to wait to be seen, not liking the diagnosis or lack of diagnosis.

We have to remember that they don’t know what we know! We need to explain what we know in a way that they can understand and in a timely fashion. When I was an ER nurse I was trained by some amazing nurses and one of the things I was trained to do was to explain EVERYTHING. We had a speil for all the different visits and procedures and proceeded to talk through everything we were doing.

Putting in an IV? Here’s how IVs work, here’s how this specific style of IV works, here’s why I may have to try multiple times, here’s why we need to give you two IVs, here’s why I can’t put the IV in your hand or antecube, here’s why I need to take multiple vials of blood.

In the ER for abdominal pain? These are the tests we will likely perform, here are the things we are looking for and ruling out, here is the reason you can’t eat right now and here is approximately when you will be able to eat, this is approximately how long the tests will take to come back, if we are extra busy or a CT scanner or X-ray room is down then it may take longer. We always informed them that often abdominal pain is difficult to get a solid diagnosis and you may be going home tonight with no answers but at the very least we can rule out the scary things and the surgical things then work from there.

When a patient was there for something critical and wasn’t able to be receptive to the explanations (PCI, stroke, trauma, etc), they often had family members who needed to know because they were scared and didn’t understand. We always had a nurse or sometimes the chaplain stand with the family member and explain what was happening. Can you imagine how you would feel if your loved one was seriously ill and everyone was running around doing things and you have no idea what anything means or what’s happening?

In general, people want to know what you are doing now, what you are going to do, when they can expect answers, and what kind of answers might they be getting. Honestly, just keeping them in the loop makes them feel seen.

So how does this apply to us as school nurses? Most parents want to know all the things. Even if they don’t remember specifics, have things in writing for them to refer to if needed or to present in the case of questions. They don’t know what they don’t know, and they often don’t know what we know.

  • Policies should be stated plainly and available in written form from the district/school.
  • Keep parents updated on changing policies such as Covid management and immunization recommendations.
  • Create newsletters explaining things like what happens if your child needs medicine at school? What happens if your child becomes sick at school? What happens if your child becomes injured at school? Present this information periodically and include it in registration info, back to school night presentations, kindergarten orientation, etc.
  • Call them. If you’re ever questioning if this issue requires a phone call or communication err on the side of caution and call them, text them, dojo message them, email them, whatever, just give them a heads up. I have messaged parents because their child came to me complaining that they have an invisible injury but I know that that child will go home and tell their parent they fell or got hurt and no one let the parent know. I’ve had my share of irate parents that weren’t informed of an issue because to ME it wasn’t concerning but to them it was.
  • Meet people at their own level. This calls back to “they don’t know what we know” as most of the people in your school don’t have the nursing training you have and don’t understand medical jargon. Speak to people with vocabulary they will understand. This also applies to parents and students who may not understand english well – learn what kind of translation services you can access to communicate appropriately. Assess learning level of students and parents – I’ve had parents that can’t read and I was sending home note after note that they couldn’t read. It wasn’t till I was at an IEP meeting for the student that I found out that the parent couldn’t read and I needed to be speaking with her directly because the notes were going unseen. Obviously students themselves are at varying age levels and levels of understanding so you would meet them at their educational level as well.
  • Never be condescending and speak to people like they are stupid. Again, they don’t know what you know, they are all at different levels of understanding and education. Uneducated about a specific topic does not equal stupid.
  • Encourage research into issues and provide resources to help them get the best information. Patients should be advocating for themselves and their care but they need to have the appropriate information to make the best choices.
  • If applicable, ask questions. You want to know from them what they know about the topic already, what are their concerns and questions about it, you might even want to know where they get their info because you could be speaking to a parent who is a pediatrician and is well versed in pediatric healthcare already but just doesn’t know our specific policies. You might want to make sure that there aren’t any cultural or religious concerns that you weren’t aware of as a reason for certain choices. I’ve found that most of the time people would prefer if you asked them sincere questions regarding their culture or religious practices instead of assuming things.
  • Listen and be empathetic. It’s not enough to just explain things, we need to listen to the patient/parent/student’s concerns and craft our responses with care.
  • Remember that it’s ok if you don’t know the answers to their questions. It’s ok to tell the patient that you don’t know but you will look into the concern and find the answer for them or point them in the direction of someone who may be able to better answer.
  • Always be kind. You don’t know what kind of day someone is having or what they are going through. There is no reason to be unkind or act irritated with someone’s needs. I know it can be difficult to NOT match energies with someone but try not to.

At the end of the day, we are in a customer service industry and we are here to help people. As Nurse Noah said, “do not get hung up on the tasks of nursing over the people. This is a people business, and they have to come first.”

Bundle & Save up to 15% at MaryRuthOrganics.com

Design a site like this with WordPress.com
Get started